
MAHEMIUM'S BLOG
Offensive Security Professional

mahemium
Hacking in Style: Configuring WinDbg Classic

21 minute read

Posted on Dec 28, 2025
Table of Contents
1 ) Introduction
1.1 ) Resources
2 ) Creating your Configuration
2.1 ) Customizing the Window Layout
2.2 ) Customizing the Color Scheme
2.3 ) Saving the configuration as a Default
3 ) Advancing the Configuration
3.1 ) Installing a Syntax Highlighter Plugin
3.2 ) Other Plugins
3.3 ) Min-maxxing
4 ) Conclusion
Introduction
This is a short post on configuring WinDbg Classic to help increase efficiency while debugging or reverse engineering. A post by Zach Burlingame back in 2011 provided high level guidance on how to customize WinDbg Classic for a better debugging experience. This post will be more detailed and provide you with a script that automatically creates a registry file (.reg file) to save and load your configuration on startup.
I'm obligated to inform you that a more modern variant of WinDbg Classic -- WinDbg Preview -- is out and available in the Windows Store, or from this link. This post is specifically for WinDbg Classic.
Resources
To acquire an installation of WinDbg Classic, refer to the table below for an installation that suits your needs.
| What for | Version | URL |
|---|---|---|
| OSED Cert, Windows 10 32-bit | SDK 10.0.18362.1 32-bit WinDbg | download.microsoft.com |
| OSED Cert, Windows 7 32-bit | SDK 10.0.18362.1 32-bit WinDbg | download.microsoft.com |
| Windows 10 | SDK 10.0.18362.1 64-bit WinDbg | download.microsoft.com |
| Windows 7 | SDK 10.0.18362.1 64-bit WinDbg | download.microsoft.com |
| Windows 10 64-bit | SDK 10.0.18362.1 32-bit & 64-bit WinDbg | go.microsoft.com |
| Others (Latest, Windows 11) | Latest WinDbg Classic versions | developer.microsoft.com |
| Others (Older) | Archived versions of WinDbg Classic | learn.microsoft.com |
The complete python script that converts a saved WinDbg Classic workspace configuration file (.wew file) to a registry file (.reg file) is available on this website.
Creating your Configuration
We'll follow the process of creating a window layout for our WinDbg configuration, then we'll create / choose a color scheme.
Warning: If you plan on not spending time making a color scheme, read the color scheme section first before making a layout.
I cover customizing the window layout first so that you can see what you are doing when customizing the color scheme.
Customizing the Window Layout
When you first start WinDbg Classic, you'll be greeted with a window and a toolbar. The first thing you should do is set your preferred layout by opening the windows you want under the View toolbar entry, and drag them into the main window according to your preference.
The way you determine your preferred layout is typically influenced from another debugger's / person's layout, or is a direct copy of it which is why i'll share my preferences to help you in figuring out your preferred layout.
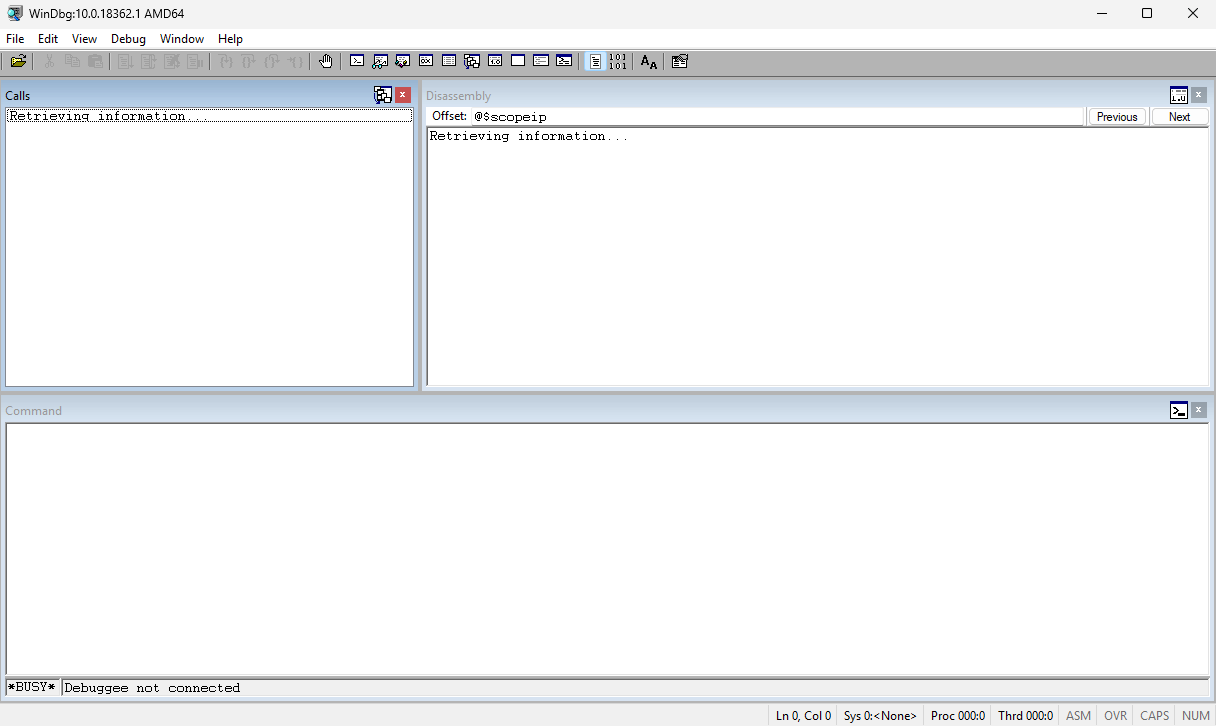
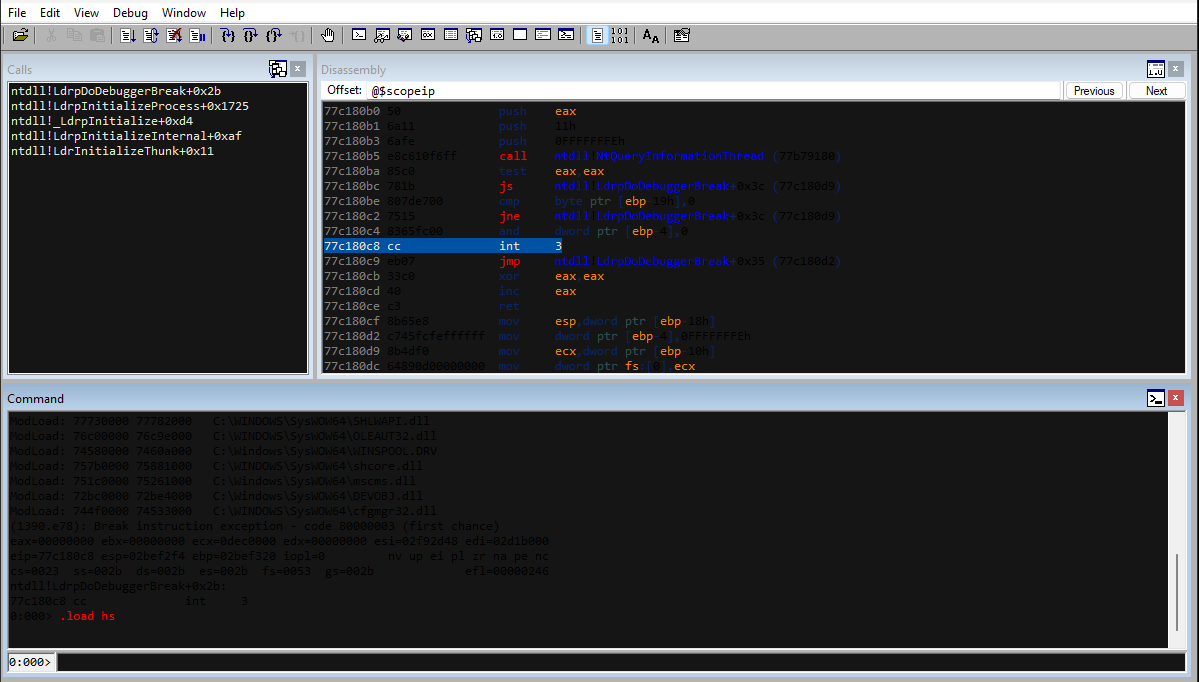
I personally prefer to have 3 windows open. The command window, the disassembly window, and the call stack window, all arranged as seen in the image below. I find that this layout is good for reverse engineering and exploit development in my opinion. Reading values from any memory address is done directly from the command window, which I think is far more powerful than the window WinDbg provides.
You can disable the call stack's toolbar by clicking on the button next to the exit button and unchecking Toolbar.
If you can't find out what your preferred layout is, don't worry about it too much since you are able to edit your configuration after applying it as a default.
Customizing the Color Scheme
The next step in configuring WinDbg Classic is setting the color scheme to your preference. To do this, let's take a look at View > Options.... At the bottom of the menu that appears, we'll see that we can configure the colors for parts of WinDbg.
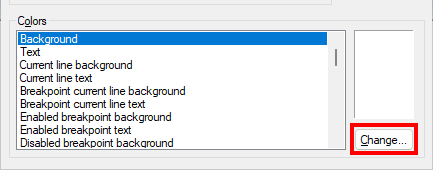
You can take the time to manually go through and set each color to whatever you like, however, this can take an afternoon. If you want a faster way of doing this, the only way is by loading a full configuration someone has made and editing it to your preference.
A couple of available colored configurations are listed below:
- Zachburlingame's Config (Dark) -- Preview
- Brownbelt's Config (Dark)
- kash1064's Config (Dark)
- XORMANCER's x64dbg Themed Config (Dark)
- nextco's Readable Theme Config (Dark & Light)
For
.regfiles, you can apply them by saving the config to a file and double clicking it to apply it.For
.wewfiles, you can apply them by clickingFile > Open Workspace in Filein WinDbg and selecting the file.Note that if you apply any of these configurations, your window layout will be altered as well.
Once you are happy with your color scheme and layout, we can move on with saving the configuration.
Saving the configuration as a Default
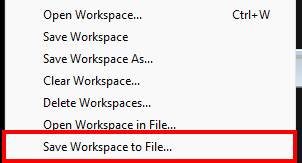
To save your new configuration and set it to be the default, you first need to save your configuration as a workspace file by clicking File > Save Workspace to File.... Beware not to confuse it with Save Workspace As.... An ideal place to save it would probably be in your Documents directory.
The next step is to apply your configuration in your Windows Registry. I wrote a script to convert the saved .wew file to a .reg file that you can use to apply your configuration. You can find it available on this website. Running the script will prompt you to select your .wew file. It'll convert the file to a .reg and ask you for a place to save it.

Double clicking on the .reg file that was converted from the .wew file will configure your registry to load your WinDbg configuration on startup.
If you're having trouble running the script, you can use the inline tool below.
Advancing the Configuration
We're able to advance our configuration further, however note that portability will be rapidly diminished from here on out. I only recommend proceeding with this section if you are not using WinDbg in a disposable virtual machine, or plan on writing a configuration deployer.
We'll first install a plugin to assist with visibility, then we'll cover other useful plugins. After that, we'll cover how we can tie everything together as one rapidly loaded unit using a batch script and a shortcut.
Installing a Syntax Highlighter Plugin
A plugin by the name of windbg-hilight facilitates syntax highlighting in the debugger and command windows. It's a really old plugin, but works well. The plugin is referenced in this collection repository, however, the original repository seems to be unavailable.
Another repository with the same name can be found here which appears to serve the same idea as the one referenced in the collection repository, and a fork of this repository with some degree of translations and updates can be found here.
I compiled the fork and provide it on this website, however, I highly recommend you compile it on your own to better help protect yourself.
If you don't want to compile the plugin, you can download it here. Be sure to verify the checksum.
File:
hs.dll-> SHA-1:ee0d9064d366d4d014028981e350cb1e0dad40eeFile:
hs64.dll-> SHA-1:0fd4c804a27b34194fcaa7dbc6c6fac992585dda
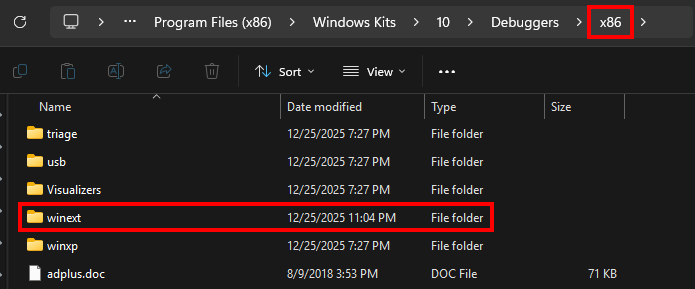
To install the plugin, you need to go to the respective architecture at C:\Program Files (x86)\Windows Kits\10\Debuggers and go to the winext folder inside.
Then you can simply drag and drop the hs.dll file into that folder, hs64.dll if you are working with 64-bit WinDbg.
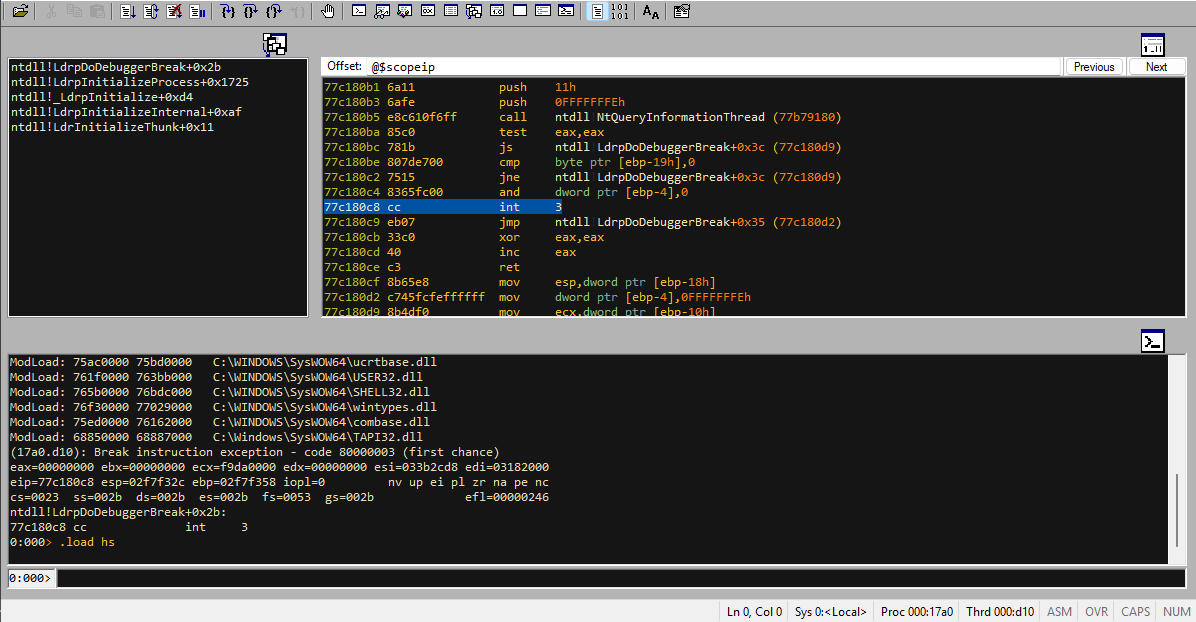
To verify that the plugin is installed correctly, start an instance of WinDbg and launch a debugging session. In the command window, type .load hs, (or .load hs64 if you're on 64-bit). You should see that the text color changes.
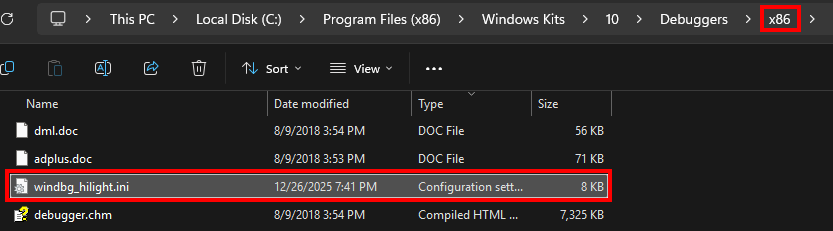
The colors will be off if you are using a dark theme. In order to configure the colors, you'll need to start WinDbg as administrator, and load the plugin. This will create the windbg_hilight.ini file in the root of your WinDbg instance (C:\Program Files (x86)\Windows Kits\10\Debuggers\x86 / x64).
Looking into this file, you may be intimidated by how it looks:
[color]
ASM_DEFAULT=0
ASM_COMMENT=65280
ASM_NUMBER=0
ASM_STRING=16711935
ASM_OPERATOR=6956042
... SNIP ...
The first thing to address here are the values. These values are simply just little endian hexadecimal color format in decimal. For example 0x0000FF, which is the color red, is 255 in decimal. You can use the inline tool below to automatically determine the value based on the color you want.
A
M
P
L
E
The second thing to address are the variables and what they correspond to. For this, I've utilized Google Gemini 3 to generate the table listed below.
| Variable | Correspondance |
|---|---|
| ASM_DEFAULT | Any value that isn't colored (General text) |
| ASM_COMMENT | Standard assembly comments (starting with ;) |
| ASM_NUMBER | Numeric literals (hexadecimal, decimal, etc.) |
| ASM_STRING | String literals enclosed in quotes |
| ASM_OPERATOR | Operators (e.g., +, -, *, /, [, ]) |
| ASM_IDENTIFIER | Labels or general identifiers |
| ASM_CPUINSTRUCTION | Standard CPU instructions (e.g., mov, push, pop) |
| ASM_MATHINSTRUCTION | Floating point or math-specific instructions |
| ASM_REGISTER | CPU Registers (e.g., rax, esp, r10) |
| ASM_DIRECTIVE | Assembler directives (e.g., db, dw, align) |
| ASM_DIRECTIVEOPERAND | Operands specifically associated with directives |
| ASM_COMMENTBLOCK | Block/multi-line comments |
| ASM_CHARACTER | Single character literals |
| ASM_STRINGEOL | Unclosed string literals at the end of a line |
| ASM_EXTINSTRUCTION | Extended instructions (e.g., SSE, AVX, VMX) |
| ASM_COMMENTDIRECTIVE | Directives used within comment fields |
| ASM_ADDRESS | The memory address prefix in disassembly (e.g., 00007ff7...) |
| ASM_OPCODE | The raw hexadecimal bytes of the instruction |
| ASM_JUMPCALL | Control flow instructions (e.g., jmp, call, jne, ret) |
| DBGCMD_DEFAULT | Default text in the WinDbg command window |
| DBGCMD_STRINGEOL | Unclosed strings in the command window |
| DBGCMD_CMD | WinDbg commands (e.g., k, g, u, dt) |
| DBGCMD_CMD_CHAR | Command-specific characters or flags (e.g., /f, /a) |
Prompt: I need you to go through that github repository (windbg-hilight) and fill in this markdown table accordingly.
With this resource and the inline tool above, you should be fully capable of creating any syntax highlighting theme you'd like. If you'd like a similar result to what i've accomplished, you can find the config on this website. A preview of it is shown in the image below.
Other Plugins
If you're studying for Offsec Exploit Developer (OSED), you may want to install the other plugins that their course covers. I personally recommend to stick to the tools they teach in the course.
- Narly -- Helps in determining active memory protections for each module
- Pykd -- Python scripting & debugging automation for WinDbg
You also may find these other plugins extremely useful.
- windbglib for mona.py -- A wrapper around Pykd for mona.py
- grep -- Grep for WinDbg
- SwitchDbgExt -- Set of very useful utility commands
Min-maxxing
In it's current state, our configuration requires us to load each plugin we want manually. To put salt in the wound, using the q command in WinDbg does not maintain the previously loaded plugins since it technically starts a new instance of WinDbg. This completely kills the workflow when using multiple debugging sessions one after the other.
To fix this, we'll rely on stitching everything together using a batch script and a custom shortcut.
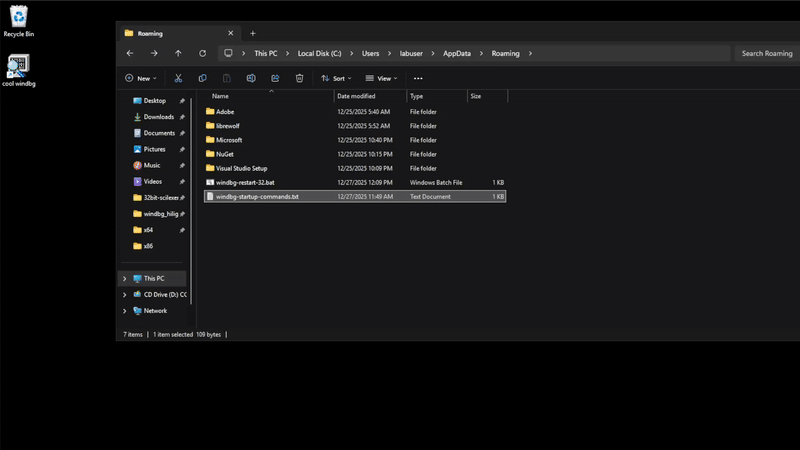
To do this, we'll create windbg-restart-32.bat (windbg-restart-64.bat if you want 64-bit) in your %APPDATA% folder. You can reach it by just typing %APPDATA% in your file explorer. We'll populate the script with the code below, you can simply copy paste it in.
@echo off
taskkill /F /IM windbg.exe >nul 2>&1
start "" "C:\Program Files (x86)\Windows Kits\10\Debuggers\x86\windbg.exe" -c "$<%AppData%\windbg-startup-commands.txt"
Note: Replace the
...\Debuggers\x86\to...\Debuggers\x64\in the WinDbg executable path if you're using 64-bit.
Next, we'll create windbg-startup-commands.txt in the same location as the batch script (%APPDATA%). Below is an example which loads windbg-hilight, narly, and pykd.
.load hs
.load pykd
.load narly
as q .shell -x %APPDATA%\windbg-restart-32.bat
.echo > LOCKED AND LOADED.
The important detail here is overriding the q command to complete the workflow. Without it, we would need to re-run WinDbg using the shortcut that we will create / modify now.
The shortcut is what will pull everything together, making the startup seamless. To do this, we can either modify the existing shortcut for WinDbg, or we can create an entirely new one, choice is yours.
Simply make the shortcut point to the windbg-restart-32.bat (or windbg-restart-64.bat) that's located in %APPDATA% and you should be good to go.
Warning: This implementation assumes that you'll only have one instance of WinDbg running which is the most common scenario for my use cases. If this isn't suitable for you, consider modifying the script to use powershell instead of batch to add more logic.
The only problem with powershell is that it is slow and can be annoying in the workflow which is why I opted to use batch.
If you do decide to use powershell, one idea I have is to make the restart script accept a PID argument, and alter the WinDbg
qalias to pass in the PID of its own process. You can set this by replacing a placeholder value in the startup commands text file and change that value using powershell.
Conclusion
I will openly admit that I dislike Microsoft, however WinDbg is an excellent tool. I personally really like how simple WinDbg Classic is compared to its predecessor WinDbg Preview. Microsoft is known to be a company that is willing to shove bloat into practically every product they develop nowadays, so it's nice to be able to use an older version of an application that they have made and push it to its limits.
Even though outdated software shouldn't be used for security purposes, I like to give some of them a bit of leeway due to their excellence, and WinDbg Classic is one of them.